iOS SSO
iOS Kerberos Authentication
Export the Root CA Certificate from AD CS
- Open Microsoft Management Console (mmc.exe)
- Under “Files”, select “Add/Remove Snap-ins”
- Under the “Available snap-ins” column, select “Certificate”, and click “Add >”
- In the “Certificate snap-in” window that appears, select the “Computer account” radio button, and select for “Local computer” radio button in the next screen. “Finish” and click “Ok” to view the “Certificates” console
- To export the Root CA certificate, navigate to Trusted Root Certificates > Certificates.
- Look for the certificate with a common name of your configured CA. Right-click it and “Open”
- In the “Certificate” window that appears, under the “Details” tab, click “Copy to File…”
- Follow the wizard to export the certificate as a “Base-64 encoded X5.09 (.CER)
- Ensure that a prompt showing you “The export was successful.” appears once you are done with the export wizard
Kerberos Authentication Certificate Template
- The next step would be to create a Kerberos Authentication Certificate Template which will be issued to iOS users/devices upon enrollment. Navigate to the Certificate Authority console.
- Under the Certification Authority tree, you can find your CA you have configured. Expand it, and right-click Certificate Templates. Click Manage to show the Certificate Templates console
- Look for the “Kerberos Authentication” template, and right-click, then click “Duplicated Template”.
- In the Properties window that appears, there will be a number of settings that will have to changed.
- Under the “General” tab, enter your desired Template Display name and Template Name. Take note of the Template Name as you will need it later.
- Under the “Request Handling” tab, select the Purpose of the certificate as “Signature and encryption”, and ensure that the “Allow private key to be exported” is checked.
- Under the “Subject Name” tab, ensure that the “Supply in the request” radio button is clicked. Click “Ok” to confirm.
- Under the “Extensions” tab, select “Application Policies” and click “Edit”. In the “Edit Application Policies Extensions” tab that appears, click “Add”, and highlight “Kerberos Client Authentication”, then click “Ok”.
- Highlight the “Kerberos Client Authentication” again, and click “Edit”. Ensure that the object identifier shows “1.3.6.1.5.2.3.4”.
- Subsequently, remove all other Application Policies, leaving just “Kerberos Client Authentication” and “Smart Card Logon”.
- Under the “Security” tab, add in the AD CS Service Account you have created to explicitly provide the required permissions. For simplicity, we will provide it with Full Control.
- “Apply” and “Ok” to save the Certificate Template
- The last step would be to add it to the list of Certificate Templates to be issued. Right-click on your CA, and under “New”, select “Certificate Template to issue”
- In the “Enable Certificate Template” that appears, select the Certificate Template with the name you have set in Step 14.
- Click “Ok” to confirm. You should now see the newly created “Certificate Template” in your Certificate Templates folder.
Import Root CA Certificate into Workspace ONE Access
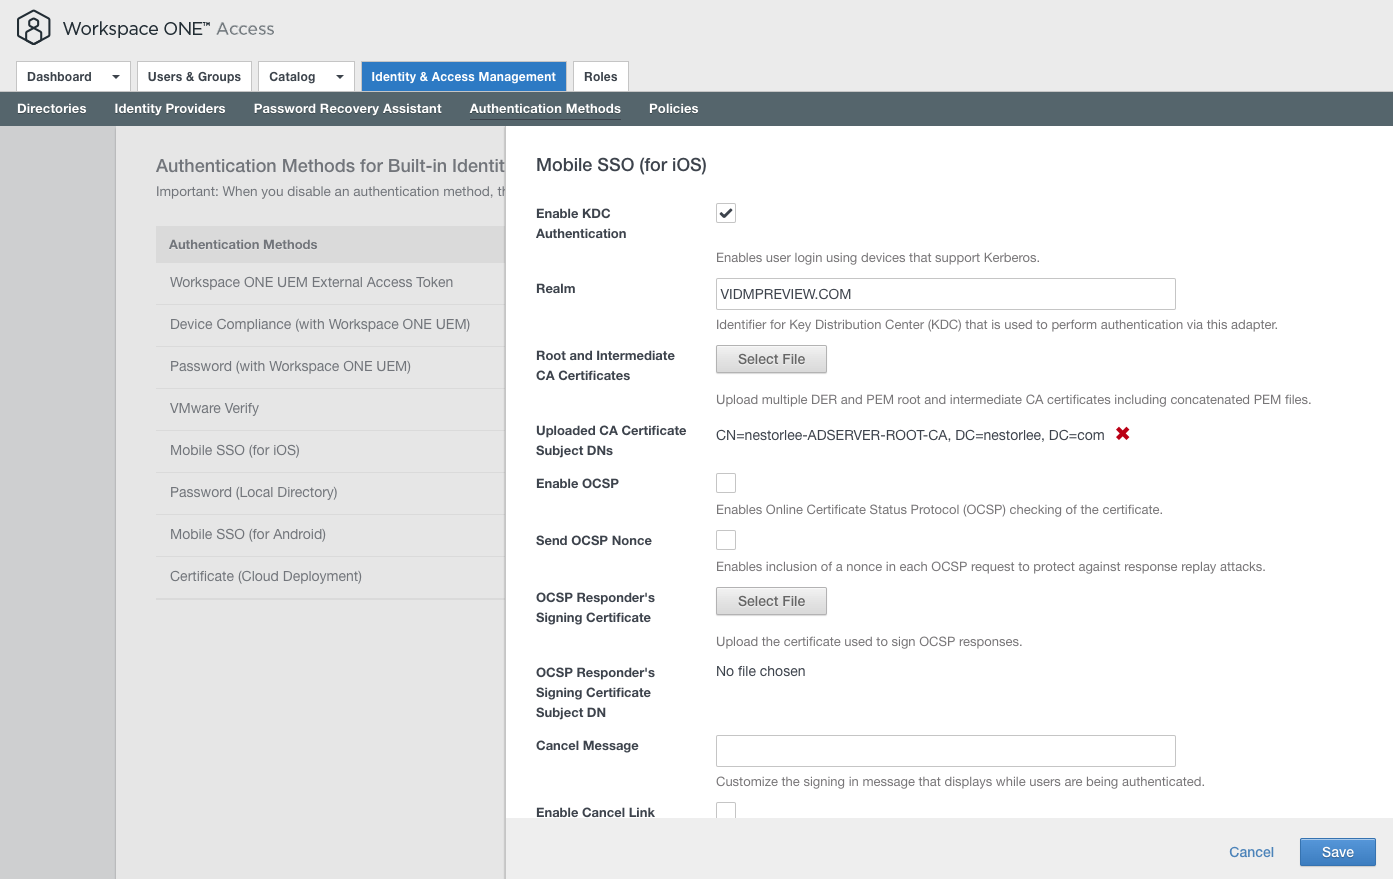
- To be able to perform Kerberos Authentication for SSO in iOS devices, in Workspace ONE Access you will have to enable the authentication method. As such, login into the Workspace ONE Access tenant as a Tenant Admin.
- Navigate to “Identity & Access Management > Authentication Methods”, and click the pencil next to “Mobile SSO (for iOS)” to configure it
- Check the “Enable Certificate Adapter” checkbox
- In the Realm, enter the top level domain name of your Workspace ONE Access Tenant. This could be “VIDMPREVIEW.COM” or “VMWAREIDENTITY”. It is important that all the characters are in caps.
- Upload the Root CA Certificate we exported in Step 8 by clicking the “Select File” button under “Root and Intermediate CA certificates”
- Save the configuration. Check that the status of “Mobile SSO (for iOS)” is now showing “Enabled”.
Allowing iOS SSO Authentication Method
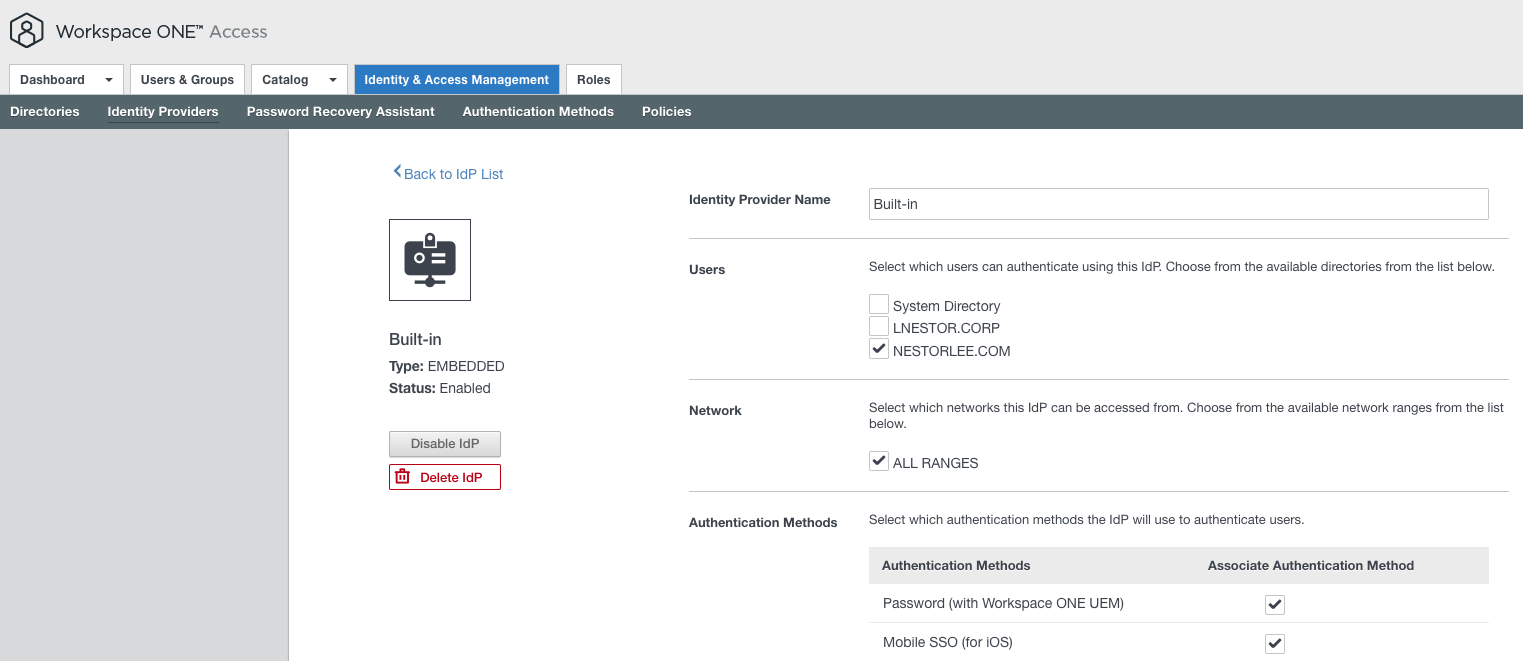
- To allow the Authentication Method for SSO in iOS devices, under “Identity & Access Management > Identity Providers > Built-in”, select the “Mobile SSO (for iOS)” checkbox.
Download Cloud KDC Certificate

- In the same window in Step 31, scroll down and find the “KDC Certificate Export” section. Click on “Download Certificate”. We will use the downloaded certificate in a later step.
Configuring Access Policies
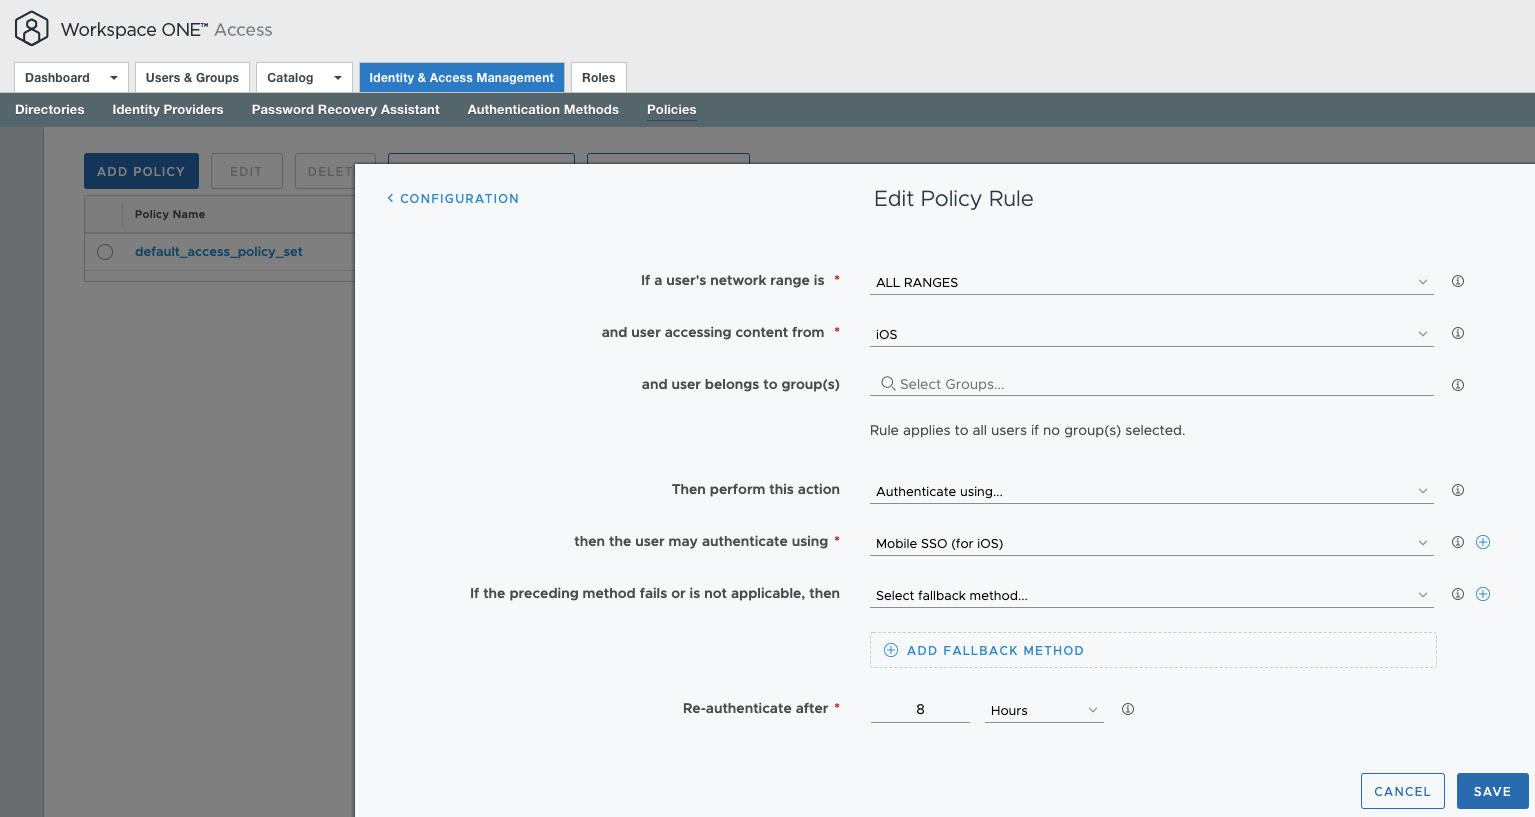
- The last step to perform in the Workspace ONE Access console would be to configure the Access Policies. Under “Identity & Access Management > Policies”, click the “Edit Default Policy” button.
- Under the “Configuration” section of the window that appears, create a new policy rule for users accessing content from iOS devices. Explicitly configure that they will authenticate using “Mobile SSO (for iOS)”. Configure the fallback method as required.
- Save the configuration and return to the Workspace ONE UEM console
Specifying Request Certificate Template
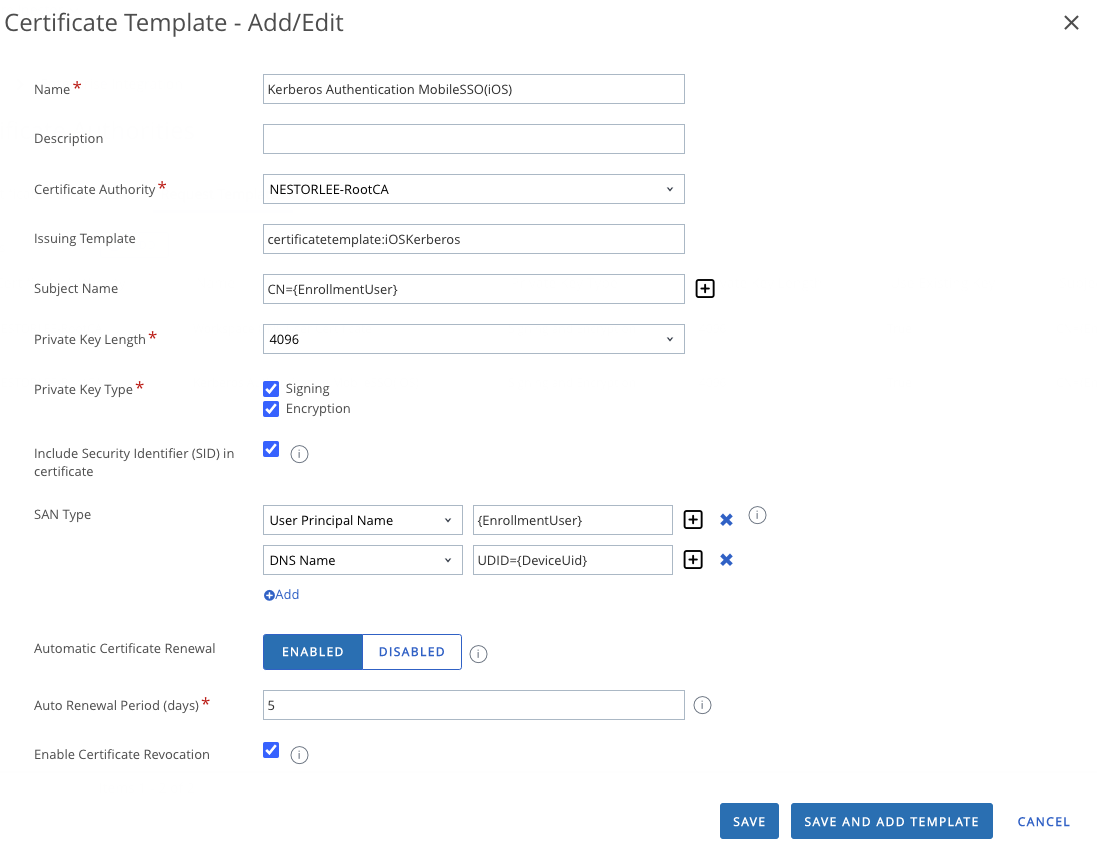
- In the Workspace ONE UEM Console, navigate to Groups & Settings > All Settings > System > Enterprise Integration > Certificate Authorities > Request Templates. Click the “Add” button to import the Kerberos Authentication Certificate Template created in Step 24.
- Fill in the fields with the appropriate values in the “Certificate Template – Add/Edit” window that comes up. Click on “Save” after filling in the values.
| Certificate Template Fields | Description |
| Name | The display name for the Certificate Template |
| Description | A description you can enter for the Certificate Template |
| Certificate Authority | Choose the Certificate Authority you integrated with Workspace ONE UEM |
| Issuing Template | Enter the template name of the template you created in Step 14 |
| Subject Name | This is used to specify and identify the certificates created for each device |
| Private Key Length | The value of the Private Key Length should be the same as what you configured |
| Private Key Type | The checkboxes you click here should be the same as the ones you have chosen at Step 15 |
| Include Security Identifier (SID) in certificate | Enabling this automatically includes the SID attribute from LDAP in the certificate subject for added security |
| SAN Type | Used for additional unique identification of the certificate |
| Automatic Certificate Renewal | Choose appropriately if automatic certificate renewal if required |
| Auto Renewal Period | If enabling automatic certificate renewal, choose the auto renewal period. |
| Enable Certificate Revocation | Enable to automatically revoke certificate when devices are unenrolled |
| Publish Private Key | Choose appropriately if private key needs to be published |
| EKU Attributes | Specify Extended Key Usages (EKU) if required |
Create iOS Device Profile

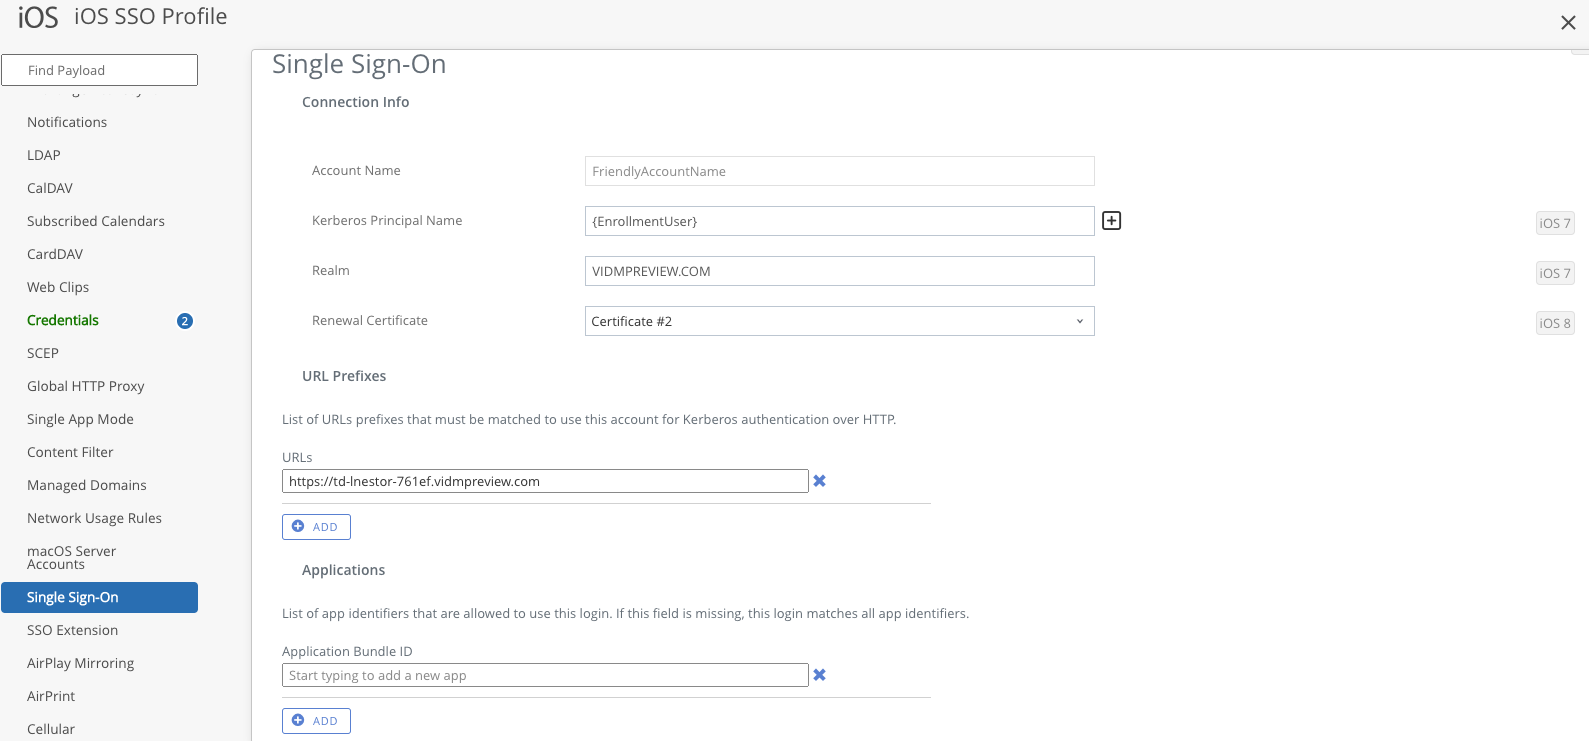
- For SSO in iOS devices, you will need to configure an iOS Device Profile which contains 3 payloads: 2 Credentials, and 1 Single Sign-On.
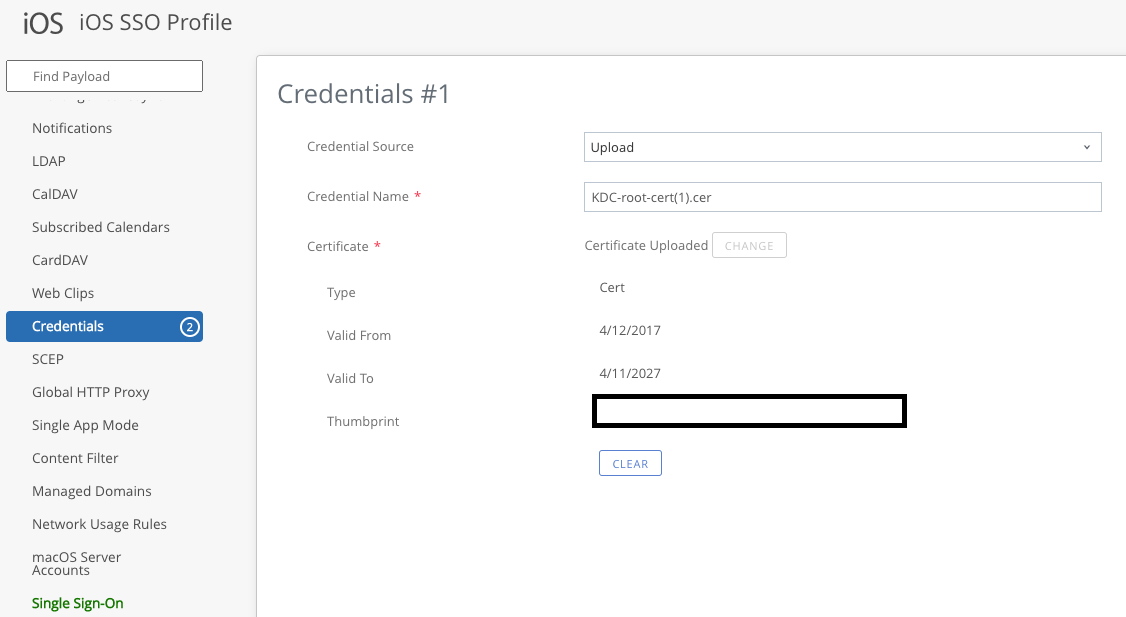
- The first Credentials payload is used to specify the Kerberos KDC Root Certificate we downloaded in Step 32. So under the Credential Source, select “Upload”, and select the .cer file to upload it to Workspace ONE UEM
- The second Credentials payload is used to specify the CA as well as the Certificate Template we created in Step 37.
- The Single Sign-On payload is used to specify the SSO parameters required. Key fields are the Kerberos Principal Name, the Kerberos authentication Realm, specifying the Certificate Template for renewal, as well as the URL Prefixes. URL Prefixes allows you to state the domains where you can use Kerberos for authentication. You can also specify the Applications Bundle field so that only the apps you specify can use the certificate to authenticate.
- Once complete, assign to the group of iOS users you wish to allow SSO for, and Save.
Testing iOS Kerberos Authentication SSO
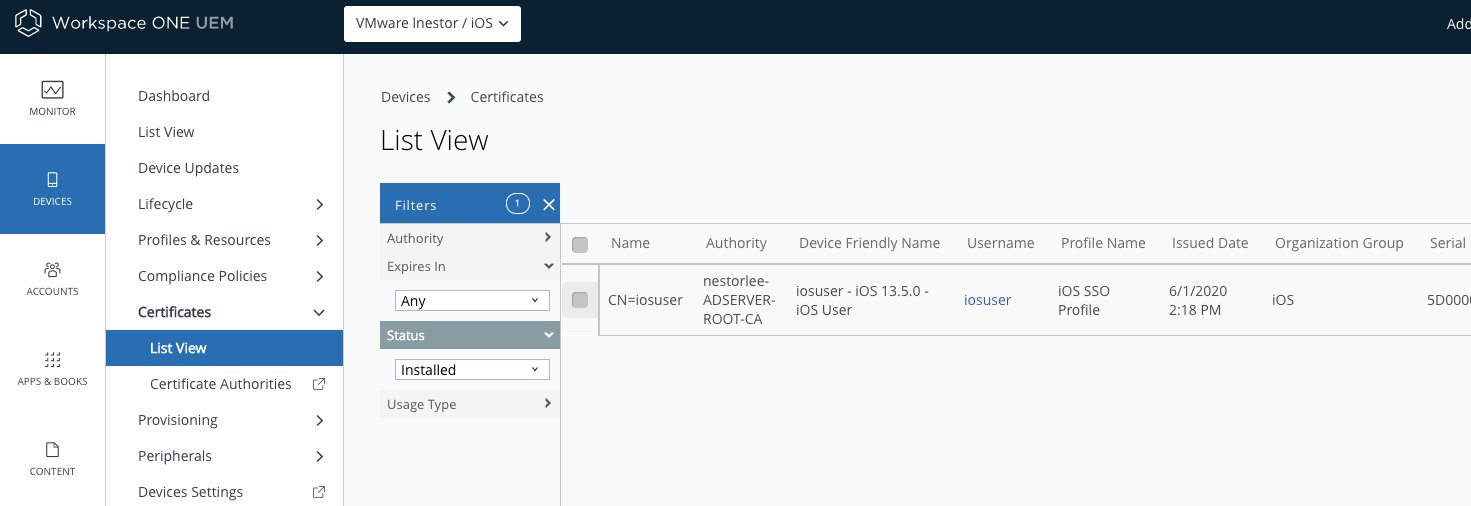
- To test out if your configuration is working as intended. You will need to first enroll your iOS devices. After enrollment, you should see the certificates assigned as listed under “Devices > Certificates > List View”
- If all is configured correctly, you should be able to access all your apps assigned once you confirm the use of your certificate for authentication.
With these 44 steps, you have configured iOS SSO using Kerberos Authentication! Continue on to view the configuration steps for the other device platforms!